
BikeBerry.com Installation Guide
Welcome to the BikeBerry.com installation guide! This comprehensive resource is designed to help you successfully install your new motorized bicycle engine kit. Whether you’re a seasoned mechanic or a first-time installer‚ our step-by-step instructions and informative videos will guide you through every stage of the process. Get ready to experience the thrill of riding a motorized bike with confidence and ease!
Introduction
Welcome to the exciting world of motorized bicycles! BikeBerry.com is your one-stop shop for high-quality engine kits and comprehensive installation guides. Our commitment to providing you with the best possible experience extends beyond simply selling products; we are dedicated to ensuring your success with every installation. This installation guide is your roadmap to transforming your ordinary bicycle into a powerful and exhilarating ride.
We understand that installing a motorized engine kit can seem daunting at first. That’s why we’ve created this easy-to-follow guide‚ filled with detailed instructions‚ helpful tips‚ and informative videos. Whether you’re a seasoned mechanic or a first-time installer‚ we’ll walk you through every step of the process‚ ensuring a smooth and successful installation.
Our comprehensive guide covers everything from choosing the right engine kit for your bicycle to connecting the fuel system and testing your newly motorized ride. We’ll address common challenges and provide troubleshooting tips to ensure a seamless and enjoyable installation experience. So‚ buckle up‚ gather your tools‚ and get ready to embark on a thrilling journey with BikeBerry.com!
Choosing the Right Kit
Selecting the perfect engine kit for your bicycle is crucial for a successful and enjoyable motorized experience. At BikeBerry.com‚ we offer a wide range of engine kits‚ each tailored to different needs and preferences. To make the right choice‚ consider these key factors⁚
- Engine Type⁚ 2-stroke engines are generally more powerful and affordable‚ while 4-stroke engines are known for their fuel efficiency and smoother operation. Choose the engine type that best suits your riding style and budget.
- Engine Size⁚ Engine size‚ measured in cubic centimeters (cc)‚ determines the power output of the kit. A larger engine will provide more power but also increase fuel consumption. Consider your desired speed and terrain to select the appropriate size.
- Bike Compatibility⁚ Ensure that the engine kit is compatible with your bicycle frame and components. Check the kit’s specifications and consult BikeBerry.com’s compatibility chart for guidance.
- Installation Difficulty⁚ Some kits are designed for easy installation‚ while others may require more technical expertise. Evaluate your mechanical skills and choose a kit that aligns with your comfort level.
- Budget⁚ Engine kits vary in price based on engine size‚ features‚ and brand. Determine your budget and explore kits that fit your financial constraints.
By carefully considering these factors‚ you can choose the right engine kit that will transform your bicycle into a powerful and exhilarating ride.
Preparing for Installation
Before diving into the installation process‚ it’s essential to prepare your workspace and gather the necessary tools and materials. This will ensure a smooth and efficient installation‚ minimizing potential complications and maximizing safety. Here’s a comprehensive checklist to guide you through the preparation phase⁚
- Secure Workspace⁚ Choose a clean‚ well-lit area with sufficient space to work comfortably. This will prevent accidents and ensure you have ample room to maneuver around the bike.
- Gather Tools⁚ Familiarize yourself with the tools required for the installation process. This may include wrenches‚ screwdrivers‚ pliers‚ a socket set‚ and a torque wrench. Ensure you have all the necessary tools readily available.
- Prepare the Bike⁚ Thoroughly clean your bike to remove any dirt‚ debris‚ or rust. This will allow for a clear view of the installation areas and prevent contamination. Consider disassembling any parts that may hinder access to the installation points.
- Safety Gear⁚ Wear appropriate safety gear‚ including gloves‚ safety glasses‚ and a dust mask‚ to protect yourself from potential hazards during the installation process.
- Review Instructions⁚ Carefully read through the installation manual provided with your engine kit. Familiarize yourself with the steps involved and any specific precautions mentioned.
- Consult Resources⁚ If you have any questions or require additional guidance‚ consult BikeBerry.com’s website‚ online forums‚ or reach out to their customer support team for assistance.
By taking these steps‚ you’ll set yourself up for a successful and enjoyable installation experience.
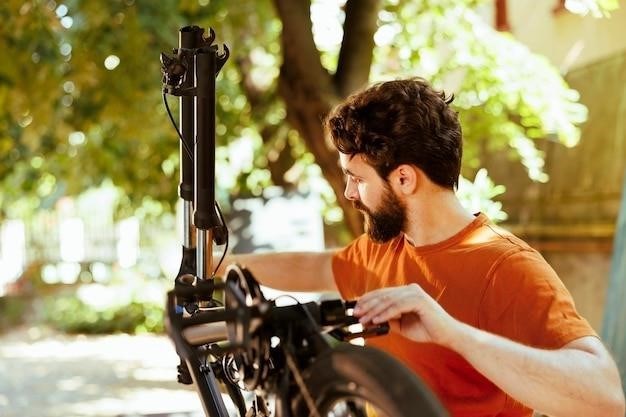
Installing the Engine
The engine is the heart of your motorized bike‚ and its installation is a crucial step. This section will guide you through the process of installing the engine securely and correctly. Remember to refer to the installation manual provided with your engine kit for specific instructions and any necessary modifications.
- Mount the Engine Bracket⁚ Begin by attaching the engine bracket to the bike frame. Ensure the bracket is securely mounted and aligned properly. Use the appropriate hardware provided in the kit to fasten the bracket.
- Install the Engine⁚ Carefully lift the engine and position it onto the mounted bracket. Make sure the engine is seated correctly and aligned with the bracket. Secure the engine using the bolts and nuts provided.
- Check for Alignment⁚ Once the engine is installed‚ double-check its alignment to ensure it’s level and properly positioned. Any misalignment could lead to performance issues or damage.
- Tighten Connections⁚ Tighten all bolts and nuts to the specified torque settings mentioned in the installation manual. Overtightening can damage parts‚ while undertightening can cause loose connections.
- Verify Stability⁚ After tightening the connections‚ gently move the engine back and forth to ensure it’s securely mounted and stable. Any movement or instability could indicate loose connections or improper installation.
- Inspect for Leaks⁚ Once the engine is installed‚ inspect for any leaks around the engine’s oil pan‚ crankcase‚ or other components. If you notice any leaks‚ address them immediately to prevent further damage.
By following these steps carefully‚ you’ll ensure the engine is installed securely and ready for the next stage of the installation process.
Connecting the Engine to the Bike
Now that the engine is securely installed‚ it’s time to connect it to the bike’s drivetrain. This step involves attaching the engine’s output shaft to the bike’s rear wheel‚ enabling power transfer. Follow these steps carefully to ensure a smooth and efficient connection⁚
- Select the Right Chain⁚ Determine the appropriate chain size for your engine and rear sprocket. Refer to the installation manual or contact BikeBerry.com for guidance. Use a chain that’s compatible with both the engine’s sprocket and the bike’s rear sprocket for optimal performance.
- Install the Rear Sprocket⁚ Attach the rear sprocket to the bike’s rear wheel. Ensure the sprocket is securely fastened to the axle using the appropriate hardware.
- Attach the Engine Sprocket⁚ Install the engine sprocket onto the engine’s output shaft. Make sure the sprocket is securely fastened using the provided hardware.
- Connect the Chain⁚ Carefully connect the chain to the engine sprocket and the rear sprocket. Ensure the chain is properly tensioned.
- Adjust Chain Tension⁚ Once the chain is connected‚ adjust its tension using the bike’s rear axle adjusters. Ensure the chain is taut without being too tight.
- Check for Chain Alignment⁚ After adjusting the chain tension‚ visually inspect the chain’s alignment. The chain should run smoothly and straight along the sprockets.
- Test the Connection⁚ With the chain connected and adjusted‚ gently rotate the rear wheel to ensure the engine shaft rotates freely and smoothly.
By following these steps‚ you’ll create a reliable connection between the engine and the bike’s drivetrain‚ enabling power transfer and smooth operation.
Installing the Throttle and Clutch
The throttle and clutch are essential components for controlling your motorized bike. The throttle regulates engine speed‚ while the clutch disconnects the engine from the drivetrain. Proper installation of these components ensures smooth and safe operation. Here’s how to install the throttle and clutch⁚
- Mount the Throttle Assembly⁚ Locate the throttle assembly‚ which typically includes the throttle grip and cable. Choose a suitable location on the handlebars for mounting the throttle grip. Secure it using the provided clamps or screws‚ ensuring it’s positioned comfortably within reach.
- Route the Throttle Cable⁚ Route the throttle cable from the throttle grip to the engine. Ensure the cable is free of kinks and runs smoothly along the frame.
- Connect the Throttle Cable⁚ Attach the throttle cable to the throttle control lever on the engine. Refer to the installation manual for specific instructions on connecting the cable to the throttle control lever.
- Install the Clutch Lever⁚ Choose a suitable location on the handlebars for mounting the clutch lever. Secure it using the provided clamps or screws; The clutch lever should be positioned comfortably within reach for easy operation.
- Route the Clutch Cable⁚ Route the clutch cable from the clutch lever to the clutch mechanism on the engine. Ensure the cable is free of kinks and runs smoothly along the frame.
- Connect the Clutch Cable⁚ Attach the clutch cable to the clutch mechanism on the engine. Refer to the installation manual for specific instructions on connecting the cable to the clutch mechanism.
- Test the Throttle and Clutch⁚ After installing the throttle and clutch‚ test their operation. Twist the throttle grip and ensure the engine revs up smoothly. Pull the clutch lever and ensure the engine disengages from the drivetrain. Adjust the cable tension as needed to achieve optimal performance.
By carefully installing the throttle and clutch‚ you’ll gain precise control over your motorized bike’s engine and drivetrain‚ ensuring a smooth and enjoyable riding experience.
Connecting the Fuel System
The fuel system delivers the lifeblood of your motorized bicycle⁚ fuel. Proper connection and routing of the fuel lines and tank ensure a steady supply of fuel to the engine‚ enabling it to run smoothly and efficiently. Here’s how to connect the fuel system⁚
- Locate the Fuel Tank and Lines⁚ Identify the fuel tank and the fuel lines included in your kit. The fuel tank is typically a small‚ compact container that holds fuel for the engine. The fuel lines are flexible tubes that connect the tank to the engine.
- Mount the Fuel Tank⁚ Choose a suitable location on the bike frame to mount the fuel tank. Ensure the tank is securely attached using the provided brackets or straps‚ keeping it clear of any moving parts.
- Connect the Fuel Lines⁚ Connect one end of the fuel line to the fuel tank outlet. Secure the connection using a hose clamp. The other end of the fuel line should be connected to the fuel inlet on the carburetor. Refer to the installation manual for specific instructions on connecting the fuel lines to the tank and carburetor.
- Route the Fuel Lines⁚ Route the fuel line from the fuel tank to the carburetor‚ ensuring the line is free of kinks or obstructions. Secure the fuel line to the frame using zip ties or cable ties at regular intervals to prevent it from rubbing or chafing against the frame or other components.
- Install the Fuel Filter (if included)⁚ If your kit includes a fuel filter‚ install it in-line with the fuel line‚ typically between the fuel tank and the carburetor. The fuel filter helps remove impurities from the fuel‚ preventing them from reaching the engine.
- Check for Leaks⁚ After connecting the fuel lines‚ carefully check for any leaks. Tighten any loose connections and ensure the fuel lines are properly secured.
By meticulously connecting the fuel system‚ you’ll ensure a reliable fuel supply to your engine‚ allowing you to enjoy the full power and performance of your motorized bicycle.
Installing the Exhaust System
The exhaust system plays a crucial role in channeling combustion gases away from the engine and into the atmosphere. It also contributes to the overall performance and sound of your motorized bicycle. Installing the exhaust system correctly is essential for efficient operation and minimizing noise pollution. Here’s how to install the exhaust system⁚
- Identify Components⁚ Locate the exhaust pipe‚ muffler (if included)‚ mounting brackets‚ and any necessary hardware. The exhaust pipe connects the engine to the muffler‚ while the mounting brackets secure the exhaust system to the bike frame.
- Connect to the Engine⁚ Align the exhaust pipe with the exhaust port on the engine. Secure the pipe to the engine using the provided bolts and nuts. Ensure the connection is tight to prevent leaks and maintain a proper seal;
- Install the Muffler⁚ If your kit includes a muffler‚ attach it to the exhaust pipe using the provided bolts and nuts. The muffler is responsible for silencing the engine’s noise. Ensure the muffler is securely attached to the exhaust pipe.
- Mount the Exhaust System⁚ Use the mounting brackets to secure the exhaust system to the bike frame. Locate suitable mounting points on the frame and attach the brackets using the provided bolts and nuts. Ensure the exhaust system is securely mounted to prevent rattling or vibration.
- Check for Leaks⁚ After installing the exhaust system‚ carefully check for any leaks. Tighten any loose connections and ensure all components are securely attached. If you hear exhaust gases escaping‚ re-tighten the connections or consult the installation manual for troubleshooting steps.
By correctly installing the exhaust system‚ you’ll ensure efficient gas flow‚ reduce noise levels‚ and enjoy the optimal performance of your motorized bicycle.
Electrical Connections
Establishing reliable electrical connections is crucial for powering your motorized bicycle engine. This step involves connecting the engine’s electrical components‚ such as the ignition system‚ CDI box‚ and wiring harness‚ to the bike’s electrical system. A careful and accurate connection ensures proper ignition‚ power delivery‚ and overall functionality of your engine. Here’s a guide to making secure electrical connections⁚
- Identify Components⁚ Locate the ignition coil‚ CDI box (Capacitive Discharge Ignition)‚ wiring harness‚ battery (if included)‚ kill switch‚ and any other electrical components associated with the engine. These components are responsible for providing the spark needed to ignite the fuel-air mixture.
- Connect the Ignition Coil⁚ Connect the ignition coil’s high-voltage wire to the spark plug. The other end of the ignition coil connects to the CDI box. Ensure the high-voltage wire is securely connected to the spark plug to prevent misfiring.
- Connect the CDI Box⁚ Connect the CDI box to the ignition coil and the wiring harness. The CDI box receives signals from the ignition coil and controls the timing of the spark. Securely connect the CDI box to the wiring harness to ensure a proper electrical flow.
- Connect the Wiring Harness⁚ The wiring harness connects the CDI box‚ ignition coil‚ and other electrical components to the battery and kill switch. Ensure the wiring harness is properly routed and securely connected to all components. Use cable ties or zip ties to keep the wiring organized.
- Connect the Battery⁚ If your kit includes a battery‚ connect it to the wiring harness. The battery provides power to the ignition system and other electrical components. Ensure the battery terminals are securely connected to the wiring harness to avoid any electrical issues.
- Connect the Kill Switch⁚ The kill switch disconnects the electrical circuit to the engine‚ stopping it. Connect the kill switch to the wiring harness and ensure it is properly wired to interrupt the electrical flow to the engine when activated.
By meticulously connecting the electrical components‚ you’ll ensure a smooth and reliable operation of your motorized bicycle engine. Always refer to the installation manual for specific wiring diagrams and connections for your particular kit.